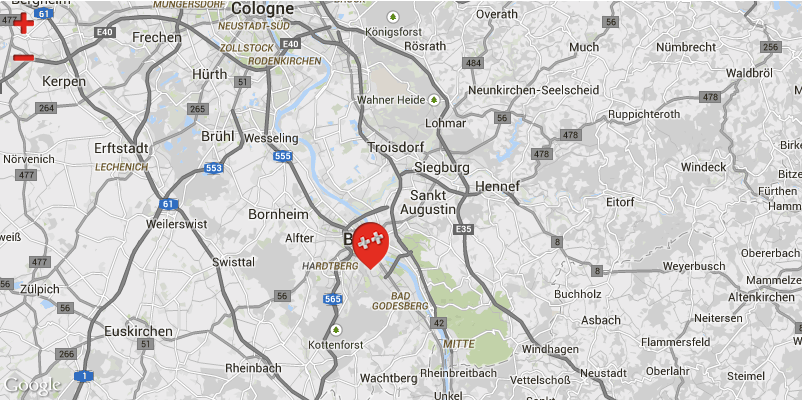
Here's a map I created some time ago with JSON and co.:
Maybe I'll create a Google Maps Creator Tool some day but until then here's how to do it yourself.
1. Setting up
- Add the Google API Script to your Page (before the customizing script we're about to create). For this project <script type="text/javascript" src="https://maps.googleapis.com/maps/api/js?sensor=false"></script> will do the trick.
Everything is set up. Now we can create a container in which the map will be loaded later on. We do this in HTML like so:
<div class="map">
    <div id="map_canvas"></div>
    <div id='placeDetails'>
        <p>53129 Bonn - This is where you'll find me.</p>
    </div>
</div>
The #map_canvas is our container for the map while #placeDetails is a custom button. Add that html anywhere you want your map to appear.
If you’re not familiar with HTML go learn it, it’s vital (and super easy).
2. Styling the Containers
We now style our map container. We give it a grey background so if something is not working we see at least that there should be something. We also style the placeDetails as we like. Here I placed it outside our .map container (which overflow is hidden) to hide it by -110%. Later on we will change this value when triggered to get the fly in effect. Lastly I hide the default Google Maps buttons I don't want and add my own controls. Note that this was my last step after I successfully implemented the map. You can only find out the right elements to hide by inspecting the map and searching for those elements. I've only already included it here for the sake of simplicity. Take a look at the CSS Selectors if you don't understand how to select the right stuff to hide in CSS.
/* Style our Map */
#map_canvas {
    background-color: #CCC;
    margin-top: 20px;
    height: 400px;
}

.map {
overflow: hidden;
position: relative;
}

/_ Style our Place Details _/
#placeDetails {
background-color: rgba(231,53,37,.8);
bottom: 0;
color: white;
font-size: .8em;
padding-left: 10px;
padding-right: 10px;
position: absolute;
right: -110%;
text-align: center;
width: 100%;
}

#placeDetails p {
margin-top: 0;
}

/_ This is to hide the default GMap Buttons _/
.gm-style-cc, #map_canvas .gm-style > .gmnoprint > .gmnoprint > div > img {
display: none !important;
}

/_ Place our own controls _/
#map*canvas .gm-style > .gmnoprint > .gmnoprint {
background: url(data/img/maps/controls.png) no-repeat center center !important; width: 42px !important; height: 68px !important;
}
/* Set where the Controls are, relative to the map canvas \_/
#map_canvas .gm-style > .gmnoprint > .gmnoprint div[title="Zoom in"] { top: 2px !important; left: 2px !important; width: 38px !important; height: 31px !important; }
#map_canvas .gm-style > .gmnoprint > .gmnoprint div[title="Zoom out"] { top: 35px !important; left: 2px !important; width: 38px !important; height: 30px !important; }
3. Implementing & Styling the map
First we set up all the styles. I used the Styled Maps Wizzard to find out the right JSON code to add in the styles variable. Then we set the options we want. There are a hell lot of options to add feel free to customise it as you wish. Creating a marker is also straight forward. Choose at least the position, the title and the icon for good results. Of course there are more marker options than those 3. By default there are only two kind of animations: BOUNCE and DROP. Bounce will let your marker constantly bounce while drop plays just once. Just try every feature out.
// This is how you style your map
var styles = [
    { "featureType": "landscape", "stylers": [ { "hue": "#FFA800" }, { "saturation": -100 }, { "lightness": 0 }, { "gamma": 1 } ] },
    { "featureType": "road.highway", "stylers": [ { "hue": "#000000" }, { "saturation": -100 }, { "lightness": 0 }, { "gamma": 1 } ] },
    { "featureType": "road.arterial", "stylers": [ { "hue": "#FBFF00" }, { "saturation": -100 }, { "lightness": 0 }, { "gamma": 1 } ] },
    { "featureType": "road.local", "stylers": [ { "hue": "#00FFFD" }, { "saturation": -100 }, { "lightness": 0 }, { "gamma": 1 } ] },
    { "featureType": "water", "stylers": [ { "hue": "#0078FF" }, { "saturation": -22 }, { "lightness": 0 }, { "gamma": 1 } ] },
    { "featureType": "poi", "stylers": [ { "hue": "#9FFF00" }, { "saturation": -28.400000000000006 }, { "lightness": 0 }, { "gamma": 1 } ]}
]

// Here we set the options
var mapOptions = {
zoom: 10,
center: new google.maps.LatLng(50.8247059,7.053153),
mapTypeId: google.maps.MapTypeId.ROADMAP,
styles: styles,
panControl: false,
zoomControl: true,
scaleControl: false,
mapTypeControl: false,
streetViewControl: false,
overviewMapControl: false,
zoomControlOptions: {
style: google.maps.ZoomControlStyle.SMALL
}
}

// Tell google where to place the map
var map = new google.maps.Map(\$("#map_canvas")[0], mapOptions);

// Create a marker
var marker = new google.maps.Marker({
position: new google.maps.LatLng(50.7097485,7.1094011),
map: map,
title: 'Creative Mate',
icon: 'data/img/maps/cm-pin4.png'
})

// Animate it
marker.setAnimation(google.maps.Animation.DROP)

// Tell where the infobox is
var info = \$('#placeDetails');
// Create the info box with animation
// Create a variable where you can store informations about the current state of the infobox
var currentPlace = null;

// Add a click function to the marker
google.maps.event.addListener(marker, 'click', function() {
// This is just for my animation, you can of course you can choose whatever to happen when this marker is clicked.
if (currentPlace) {
info.animate({right: '210%'});
currentPlace = null;
} else {
info.animate({right: '0'});
currentPlace = marker;
}
})
With google.maps.event.addListener(marker, 'click', function(){}) you can bind an action to the last marker.
And that's it. Now you have an awesome customised map!
4. Enhancing (optional)
Now this is only a very light map with only one marker. But you can create multiples markers as well. An easy way to do this would be to put the places into arrays and using jQuery .each() functionality to add as much markers as variables. Do it like so:
var places = [{
    "title": "Pin 1",
    "description": "This is pin #1",
    "position": [ -12.123456, 123.123456 ],
    "icon": "data/img/maps/cm-pin1.png",
    "url": "www.pin1.com"
},
{
    "title": "Pin 2",
    "description": "The second pin.",
    "position": [ -23.123456, 124.123456 ],
    "icon": "data/img/maps/cm-pin2.png"
    "url": "www.pin2.com"
}]

\$(places).each(function() {
var place = this;
var marker = new google.maps.Marker({
position: new google.maps.LatLng(place.position[0], place.position[1]),
map: map,
title: place.title,
icon: place.icon,
})

    google.maps.event.addListener(marker, 'click', function() {
        window.location.href = place.url;
    })

})
Happy Mappin'!
Comments